Valorant Keeps Crashing on Windows 11: Why & How to Fix it
On this page, you will learn how to solve if Valorant keeps crashing on Windows 11. And you can learn the best way to backup your Windows system and important files with ease.
By Jonna Updated on October 27, 2023
Why Valorant Keeps Crashing on Windows 11?
Numerous users have encountered Valorant crashes while engaging in gameplay on Windows 11. some of them faced this issue in the middle of games, while some have experienced this issue in its startup. In any case, it can be really frustrating as it keeps you away from playing games smoothly. Why Valorant keeps crashing on Windows 11? There are some common reasons:
- Your computer does not meet the minimum requirements to run Valorant, causing Valorant keeps crashing without error.
- A large amount of resource-consuming software is running on your system, causing insufficient memory and resulting in Valorant not working on Windows 11.
- Outdated graphics drivers can also cause Valorant keeps crashing on Windows 10/11.
- Your antivirus software is causing Valorant not opening.
- Corrupted game files, server glitches or errors, and more factors.
After checking the reasons, if you don’t know what to do if Valorant keeps crashing, please go on to get quick fixes to this issue.
9 Quick Ways to Fix Valorant Keep Crashing on Windows 11
Here is a set of effective techniques to consider if Valorant keeps crashing in mid game or on startup on Windows PC.
Method 1. Check System Requirements to Run Valorant
Each PC game, including Valorant, comes with a specified set of system requirements. When these prerequisites aren't met, the game may crash without providing specific error messages. If Valorant keeps crashes without error on Windows 11/10 system, your initial step should be to verify that your hardware meets the game's minimum requirements.
|
Minimum specs for Valorant (30 FPS) |
Operating System: Windows 10/8/7 64-bit Memory: 4 GB RAM VRAM: 1GB CPU: Intel i3-370M Graphics Card: Intel HD 3000 |
|
Recommended specs for Valorant (60 FPS) |
Operating System: Windows 10/8/7 64-bit Memory: 8 GB RAM VRAM: 1GB CPU: Intel i3-4150 Graphics Card: GeForce GT 730 |
Method 2. Update Your GPU Driver
Outdated graphics card drivers can be a leading cause ofValorant not working/launching/opening on Windows 11. To resolve this issue, follow these steps to update your graphics driver:
Step 1. Type Device Manager in the Windows search bar to open it.
Step 2. Expand the Display adapters category, right-click GPU driver and click on Update driver.
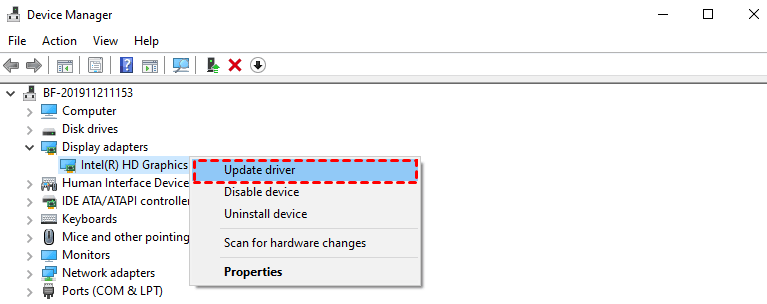
Step 3. Select Search automatically for driver on the pop-up screen. If there's an update available, it will be installed automatically.
Method 3. Run Valorant as Administrator
You can try to run the game with administrator privileges and see if Valorant keeps crashing and restarting on Windows 11 is fixed.
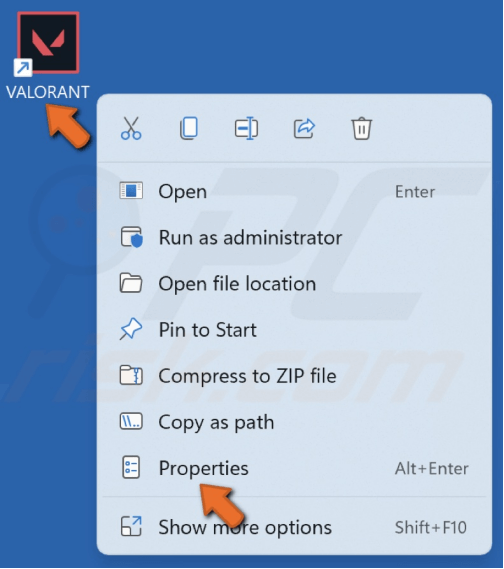
Step 1. Right-click on Valorant's executable file, and click Show more options > Properties in turn.
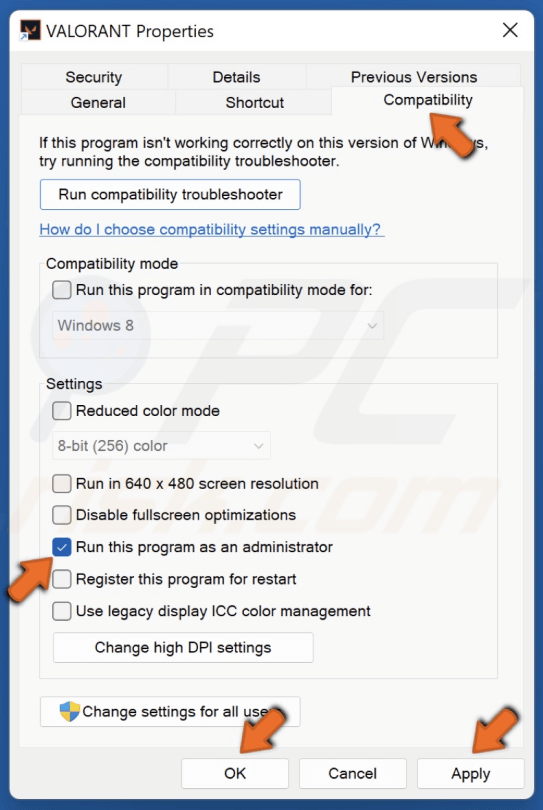
Step 2. In the Properties window, go to the Compatibility tab. Check the box next to Run this program in compatibility mode for and select an older Windows version from the dropdown menu.
Step 3. Under Settings, check the box next to Run this program as an administrator. Click on Apply > OK.
Method 4. Manage In-Game Settings
If your PC meets the minimum requirement, but Valorant continues to crash, it might be due to imbalanced in-game settings. To address this issue, we recommend adjusting the GPU settings within the game:
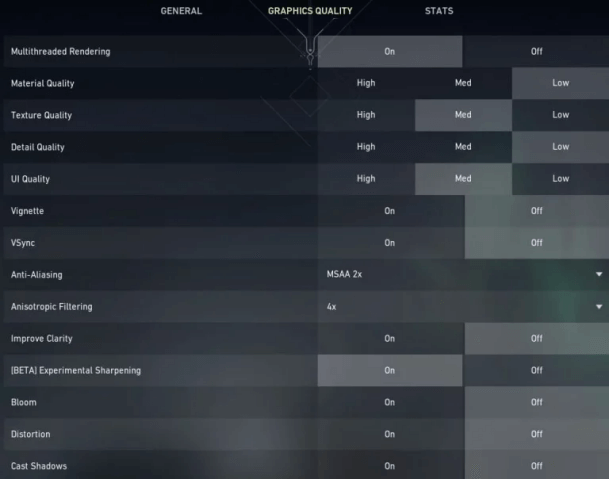
Step 1. Launch Valorant, navigate to Game Menu > Settings > Video > Graphics Quality subsequently.
Step 2. Set all quality settings to Low and see if this resolves the problem.
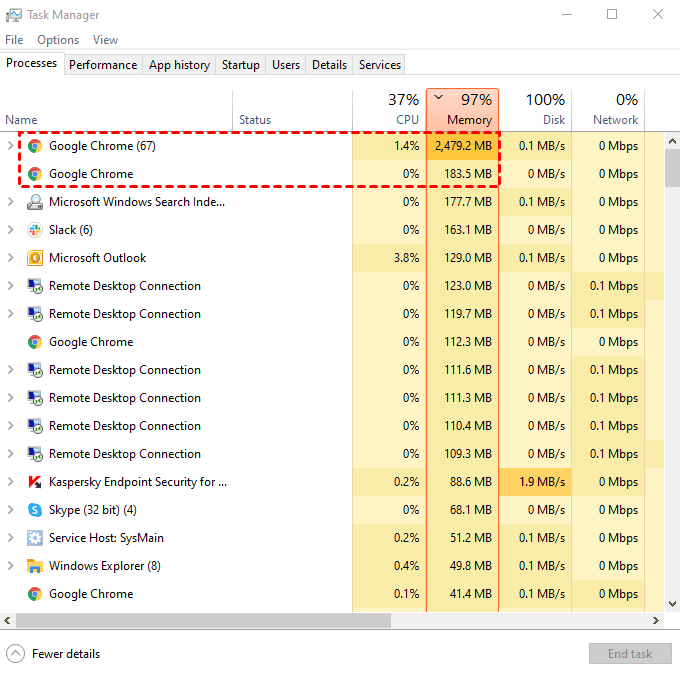
Method 5. Close Resource Intensive applications
Other running programs on PC can also consume valuable system resources, leading to Valorant not working on Windows 11. To address this, it's advisable to close resource-intensive programs when running Valorant. Here's how to do it:
Step 1. Click on the search icon and type Task Manager in the search bar to open it.
Step 2. Under the Process tab, right-click any programs that are consuming excessive memory and select End task to close them.
Method 6. Check Windows 11 for All Updates
Some gamers report that resolving the Valorant crashing on startup issue can be as simple as installing all pending Windows updates. Keeping your system up-to-date is a sound practice for enhanced performance and security. Follow these steps to ensure your Windows system is updated:
Step 1. Press Windows + I to open Windows settings, then select Update & Security.
Step 2. Click on Check for updates.
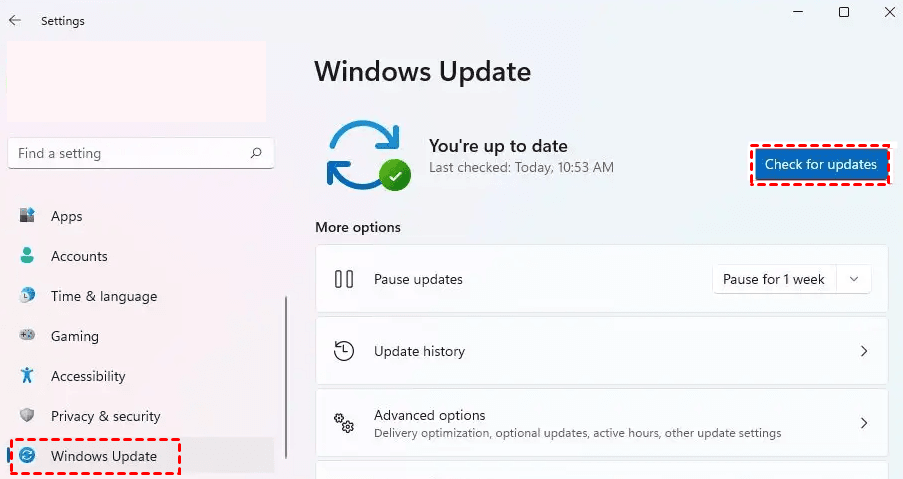
Step 3. Windows will now search for available updates and provide you with the option to download and install them.
Step 4. Once the updates are installed, restart your PC to apply the changes, and then launch Valorant to see if the issue has been resolved.
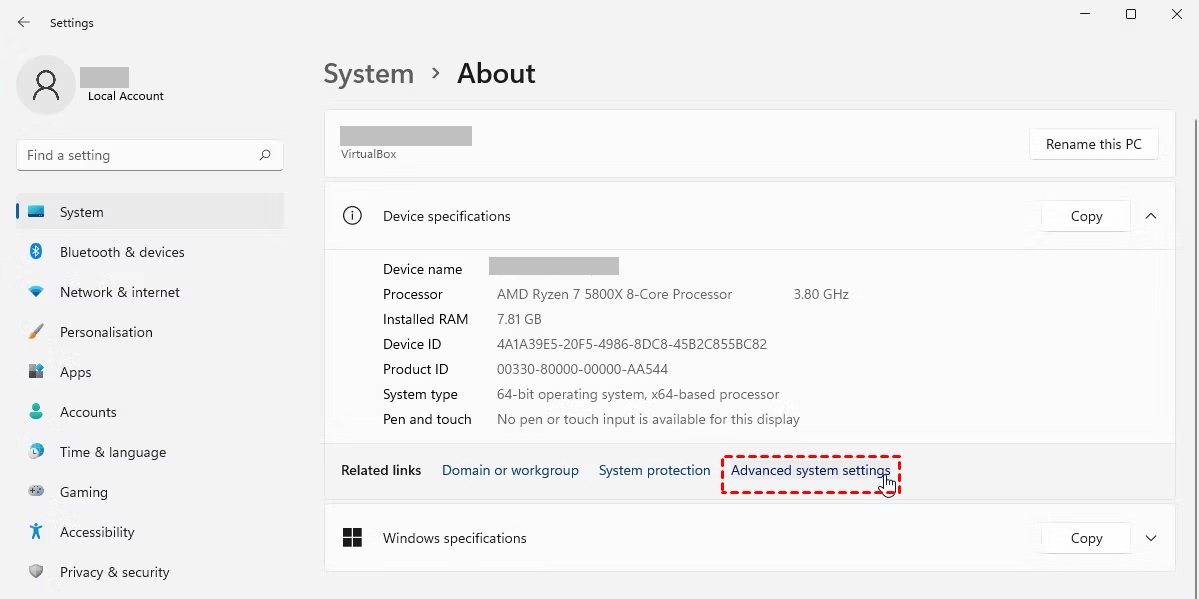
Method 7. Increase Virtual Memory
Windows 11 tends to consume more RAM resources, which can contribute to Valorant crashing issues. To alleviate this problem, you can increase your virtual memory. Here's how to do it:
Step 1. Open Windows settings, navigate to System and then About.
Step 2. Click Advanced system settings, and tap on Settings within the Performance box.
Step 3. Select the Advanced tab and click Change under Virtual memory.
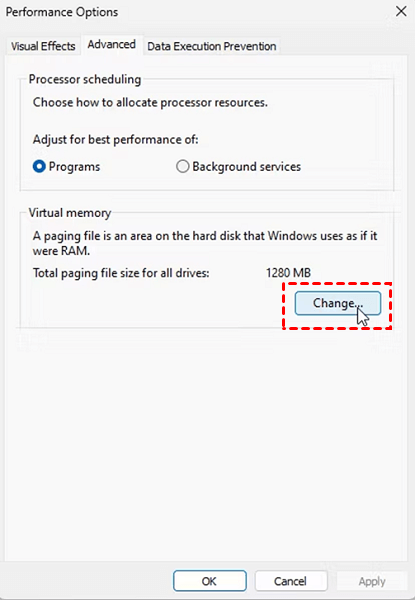
Step 4. Uncheck the box next to Automatically manage paging file size for all drives and select Custom size.
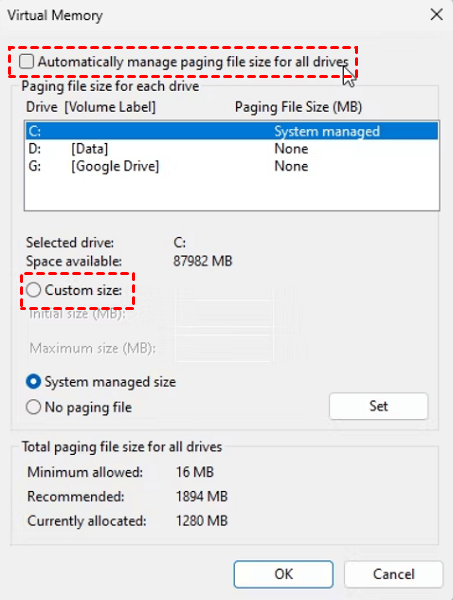
Step 5. Set the same value for Initial size and Maximum size. Typically, this value should be 1.5 to 2 times the size of your physical memory.
Step 6. Click Set and OK to save the changes.
Method 8. Perform a Clean Boot
In instances where other programs interfere with Valorant, Volrant keeps crashing on Windows 11 or 10 may happen. In such cases, performing a clean boot comes to the rescue. Here’s how to do it:
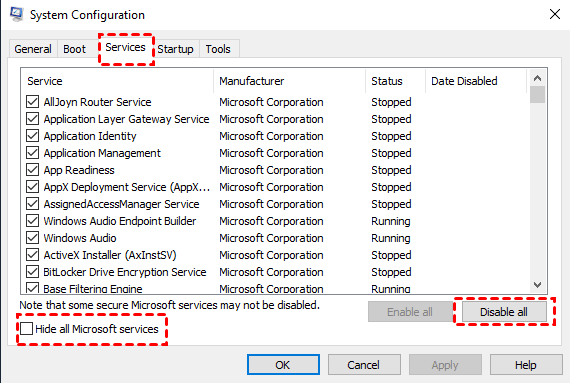
Step 1. Press Win + R to open the Run dialog box, type msconfig, and click OK to open the System Configuration window.
Step 2. Switch to the Services tab, check Hide all Microsoft services, and click on Disable all.
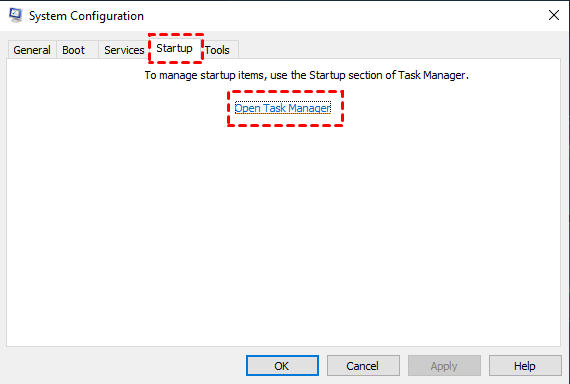
Step 3. Go to the Startup tab and tap on Open Task Manager.
Step 4. In the list of running applications, select each item one by one, right-click, and choose Disable.
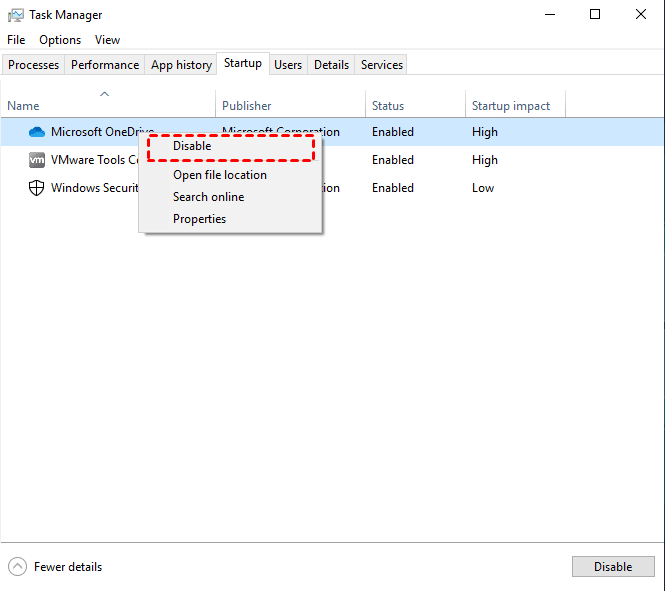
Step 5. After disabling all the running applications, return to the System Configuration window, click OK to save the changes and restart your computer.
Method 9. Reinstall Valorant and Vanguard
If none of the previous solutions have resolved the issue, reinstalling the game is a viable step to restore game settings and rectify any corrupted game files causing Valorant to crash on Windows 11. Here's how to do it:
Step 1. Press Windows + R to type control. Click OK to open Control Panel.
Step 2. In the Control Panel window, select Programs and then Programs and Features.
Step 3. One by one, select Valorant and Riot Vanguard, and proceed to uninstall them.
Step 4. Go to Valorant website and download the game installer to reinstall Valorant.
Bonus Tip: Backup Computer and Important Files Regularly to Avoid Data Loss
The methods outlined above should prove helpful in resolving the issue of Valorant keeping crashing on Windows 11 in mid game or on startup. To proactively safeguard against potential future problems, it's advisable to create system backup or file backup regularly to prevent data loss.
AOMEI Backupper Standard is an all-in-one Windows backup and restore software. Fully featured, including Backup, Restore, Clone, and Synchronization. You can use it to create system backup, disk backup, partition backup, and file backup. Furthermore, the ability to create bootable media ensures that in the event of a severe system issue, such as a system crash, you can swiftly return your computer to a stable state using the bootable media and your system backup.
Here we take creating a system backup for your Windows 11 computer as an example to show you the detailed guide.
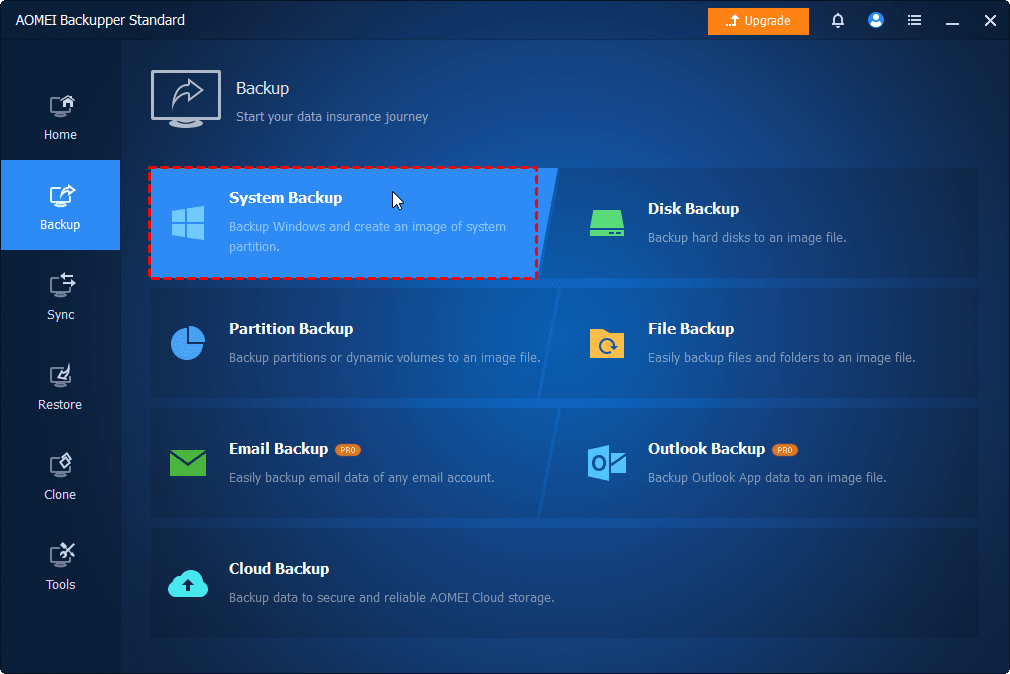
Step 1. Download and run the AOMEI Backupper software, click Backup on the left side of the main interface, and then select System Backup.
Step 2. The program will automatically choose the system and boot partitions as the source. Next, select a destination path to save the system backup.
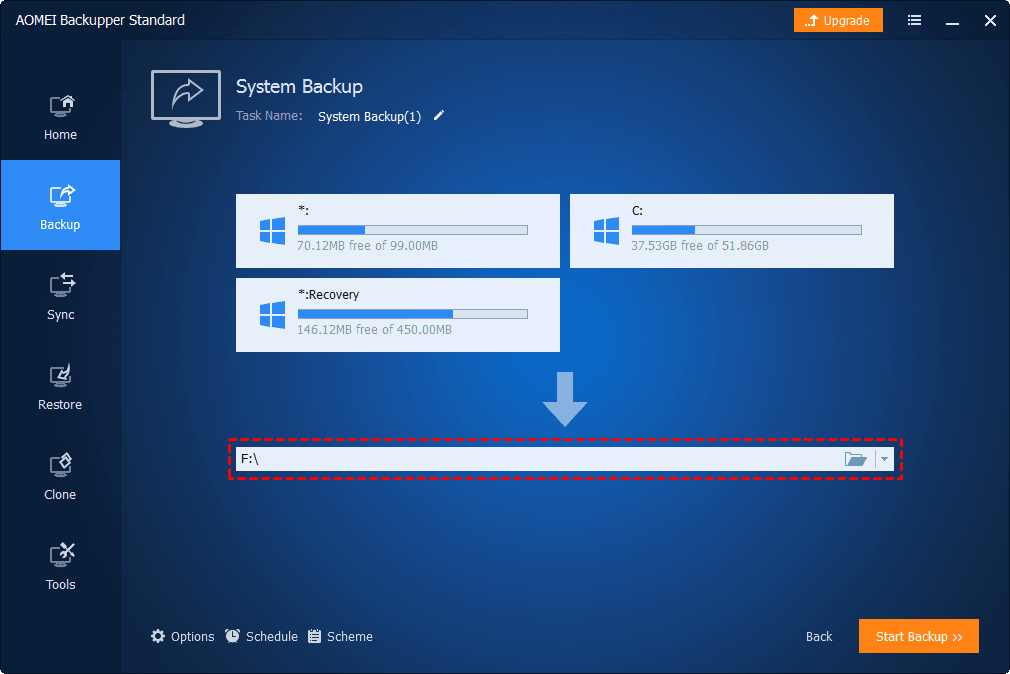
Step 3. Finally, click Start Backup to initiate the system backup process in Windows 11.
- More backup features you can enjoy:
- Options: This feature empowers you with the ability to add comments to your system backups, compress system backup image files to save storage space, and configure email notifications to stay informed about backup progress and results.
- Schedule Backup: This feature can ensure that your system backup is always up to date by capturing the latest changes after a full system backup. You can specify the backup frequencies, such as daily, weekly, monthly, event triggers or USB plug in.
- Backup Scheme: You can choose the wanted backup method: full backup, incremental and differential backup here. Additionally, you can enable automatic cleanup of older backups to free up space on the target disk.(Differential backups and auto-delete backups are available in the Pro version.)
Summary
If you encounter the problem of Valorant keeps crashing on Windows 11, don't worry. You can find the appropriate solution in this article. To prevent unforeseen errors causing data loss on your Windows 11 computer, it is recommended that you backup your system as well as important files as soon as possible.
Using AOMEI Backupper software, you can backup Windows systems, as well as create file backup to external disk, network drive, and more locations.