How to Transfer Photos from Windows 11 to USB Stick (2 Ways)
You can learn why transfer Windows 11 to USB stick and 2 easy &secure methods to achieve the goal. You can keep reading and scroll down for more detailed information.
By Clytze Updated on May 9, 2024
Why Transfer Photos from Windows 11 to USB Stick?
Nowadays, there are more and more users who want to transfer important photos, files or videos from their computers to external devices such as USB stick. Why is there such a trend?
This article summarizes for you the following 2 most common and important reasons.
- Enhanced security: Photo transfer from Windows 11 to USB stick can enhance the security of photos. If your computer accidentally has any problems that cause photos to be lost, you can still view them in the USB.
- Easy to carry: The photos are stored in the USB stick and the USB stick is very portable. Therefore, when you want to view your photos, you can always plug the USB into your nearest computer instead of carrying your own computer for this purpose.
How to Transfer Photos from Windows 11 to USB Stick
After understanding the reasons, next, this article will introduce 2 useful ways to achieve the goal. You can keep reading to learn how to copy files in Windows 11 to USB stick. Both the Windows self-contained settings and professional free third-party sync software can help you.
Method 1. Use External Storage Device
For the first method, you just need to connect the USB stick to the computer and make sure the computer recognizes it. Then follow the steps below to transfer photos to USB stick. Your flash drive should preferably be greater than or equal to 64GB and make sure it has enough free space to store photos. But this is generally not used to transfer large files.
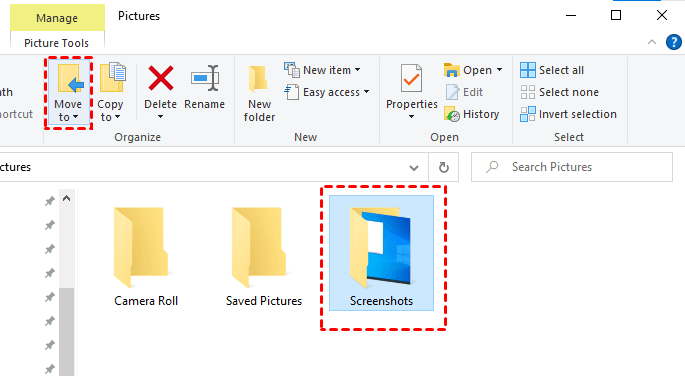
Step 1. Navigate to Start Menu > File Explorer > This PC.
Step 2. Under Device and Drives, double-click on your USB stick name. Make sure your flash drive has adequate space to store your files.
Step 3. Go to the locations where store tee photos that you want to transfer and select them.
Step 4. Click on the Move to button and select your USB stick name to move the files.
Method 2. Use Free Sync Software
If you want to an easier way to transfer photos to USB stick or other devices, you can choose the free third-party sync software AOMEI Backupper Standard to help you achieve the goal. Not only that, it allows you to freely choose the source and destination of file sync.
Therefore, you can easily master how to transfer files to a flash drive in Windows 10, how to transfer photos from Windows 10 to USB stick, and how to transfer photos from USB to USB, etc. It has these other advantages as well.
- Automatic sync: It can automatically sync local folders in Windows 11 to the USB stick with fixed intervals, such as Daily, Weekly, Monthly.
- Multiple devices: It supports syncing photos to the USB stick and other devices, like HDD, SSD, external drive, NAS, network, cloud, etc.
- Different operating systems: It supports not only Windows 11, but also all other Windows OS, such as Windows 10/8.1/8/7/XP/Vista.
Then you can download this freeware and follow the graphic tutorial below to transfer photos from Windows 11 to USB stick easily. By the way, If you are a Windows Server user, you can pick AOMEI Backupper Server.
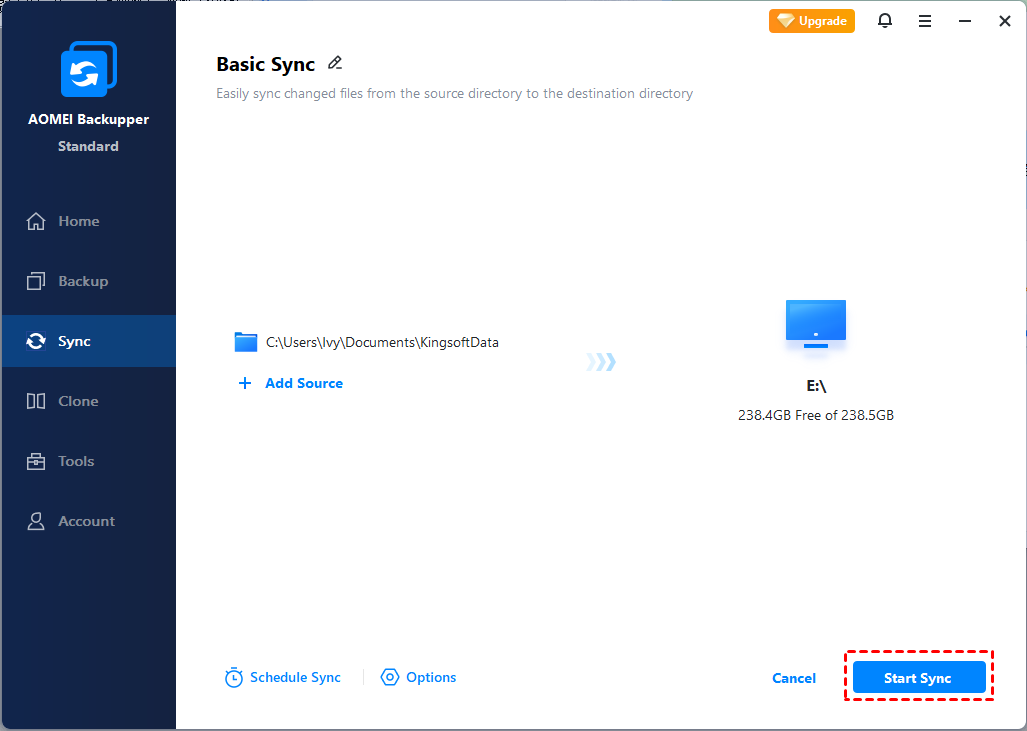
Step 1. Open the freeware - AOMEI Backupper Standard and click Sync > Basic Sync.

- Notes:✎
- It also provides other 3 sync features to meet your different needs. You can upgrade to the professional version or higher versions to enjoy them if you need.
- Mirror Sync: It will keep the destination directory the same as the source directory and any additional files in the target folder will be deleted.
- Two-Way Sync: It will sync the changes in the source directory to the destination directory and vice versa.
- Real-Time Sync: As soon as the folder in the computer is changed it will immediately be synced to the destination.
Step 2. Click Add Folder to select the photos you want to sync. If you’d like to add multiple folders, just click the + icon repeatedly and add all the folders that need to be synced.
![]()
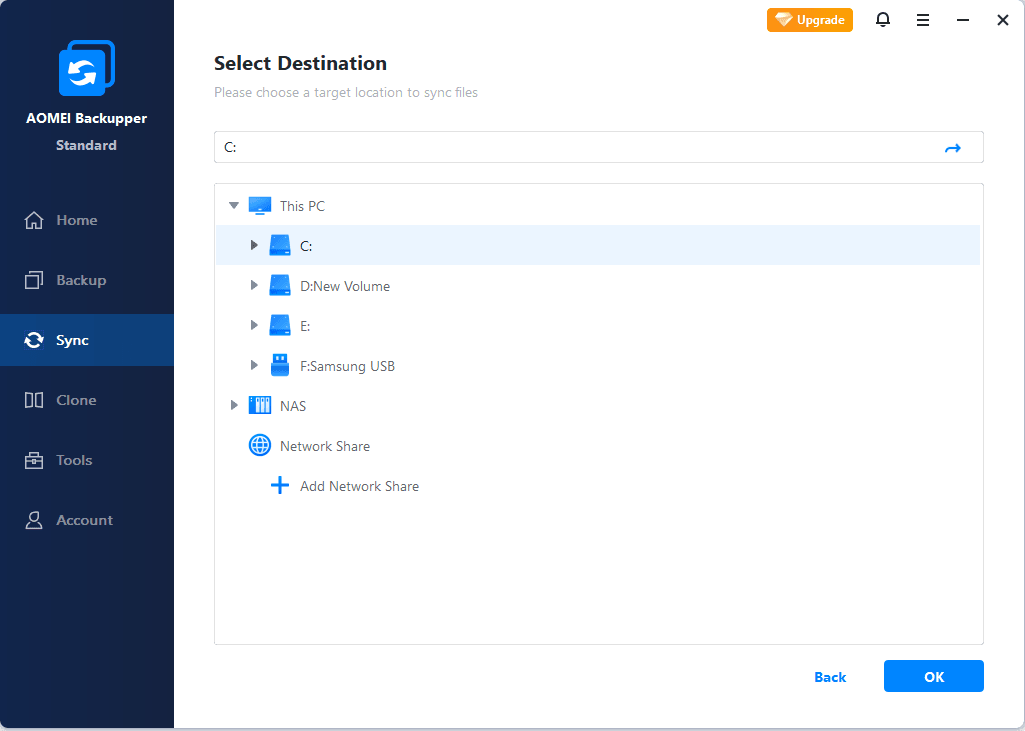
Step 3. Click the inverted triangle at the right edge of the second bar and choose USB stick as the destination location.
Step 4. Confirm your operations and click Start Sync to transfer photos from Windows 11 to USB stick.
- Notes:✎...
- Options: It allows you to write comments for your synced files to distinguish them or you can set up email notifications which can tell you when the sync task has been completed.
- Schedule: It can automatically sync your photos, and you can set the fixed frequencies such as Daily/Weekly/Monthly/Event trigger/USB plug in for scheduled sync task. The last two are supported by the advanced version.
Summary
This article introduces how to transfer photos from Windows 11 to USB stick in 2 ways. You can realize the transfer of fewer photos or files with Windows built-in settings. However, an easier and more efficient way is to use a free third-party sync software - AOMEI Backupper Standard to help you achieve the goal. It not only can easily transfer photos from Windows 11 to USB stick, but you can choose any source and destination to sync depending on your actual needs.
In addition, it is also an excellent backup software. To meet the different needs of users, it provides System Backup, Partition Backup, Disk Backup and File Backup to protect your data in all aspects. You can download this software to explore more useful features.