How to Safely Backup VMware ESXi Virtual Machines [3 Ways]
Backing up the entire VM is an important measure to ensure the VM data security. In this article I will introduce the basic knowledge and 3 ways to safely backup VMware ESXi virtual machines.
By Crystal / Updated on May 11, 2024
VMware ESXi VM Backup Overview
VMware ESXi, the core of VMware vSphere enterprise virtualization suite, formerly called ESX until version 4.1, is a bare-metal hypervisor installed directly onto physical server, providing direct access and control of the underlying resources. It allows you to create and run multiple virtual machines using a single physical host.
As with other data types, virtual machine backup is an important protection measure to ensure you recover important data in time and keep business continuity. But backup VMware ESXi is different from backing up normal files in terms of concept and methodology.
In this article, I will briefly introduce the basic knowledge and offer 3 free VMware ESXi backup solutions for you.
Backup options for VMware ESXi
In general, there are 2 main types of virtual machine backups:
Image-based backup that contains the operating system, configuration files, and all data on the disk.
File-based backup that backing up the VM as a physical machine by installing an agent on the guest machine.
✎File-based backup do not include the virtualized environment, so the best way to backup VMware ESXi virtual machines entirely is still image-based backups. It allows you to restore entire VM, which is especially convenient when you have multiple VMs to protect.
In this post I will mainly introduces image-based backup methods. If you want to perform file-based VM backup and customize what to backup (files/folders/partitions/OS), you can turn to file-based backup.
![]()
One agentless solution to auto backup VMware ESXi VMs - Best Way
There are some options to backup VMware ESXi free using built-in features. But unfortunately, all of them need to be operated manually, and can only back up one single VM at a time. It’s inconvenient for enterprises that manage a large number of VMs.
Therefore, I'd like to introduce an easy way to automatically backup multiple virtual machines at once, which builds a robust backup and recovery plan in your VMware vSphere environment.
Here I will use the free ESXi backup software - AOMEI Cyber Backup. It can be the best way to backup VMware virtual machines. And it facilitates VMware ESXi backup and restore, and offers you the following benefits:
✦ Centralized Backup: With 3 easy steps you can create a backup task for multiple VMs without installing agent on each of them.
✦ Support Free ESXi: support both paid and free versions of VMware ESXi.
✦ Automation: Run unattended backup tasks daily, weekly, or monthly automatically and notify by email.
✦ Restore from Any Point: Restore the entire VM from any selected history version quickly and easily.
✦ Backup to all locations: This tool supports backup VMware virtual machines to external hard drive, local storage, NAS drive, network share, etc.
✦ Role Assignment: Allows one administrator to create sub-accounts with limited privileges, effectively reduced administration costs and manual errors.
In the next part I will demonstrate how to backup multiple VMware ESXi VMs for free in 3 easy steps. You can click the button below to download the free backup software for VMware ESXi VMs, and get the exclusive upgrade discount:
*You can choose to install this VM backup software on either Windows or Linux system.
How to backup VMware ESXi virtual machines (3 steps)
1. Bind Devices: Access to AOMEI Cyber Backup web client, navigate to Source Device > VMware > + Add VMware Device to add vCenter or Standalone ESXi host as the source device. And then click … > Bind Device.

2. Create Backup Task: Navigate to Backup Task > + Create New Task, and then set Task Name, Backup Type, Device, Target, Schedule, and Cleanup.
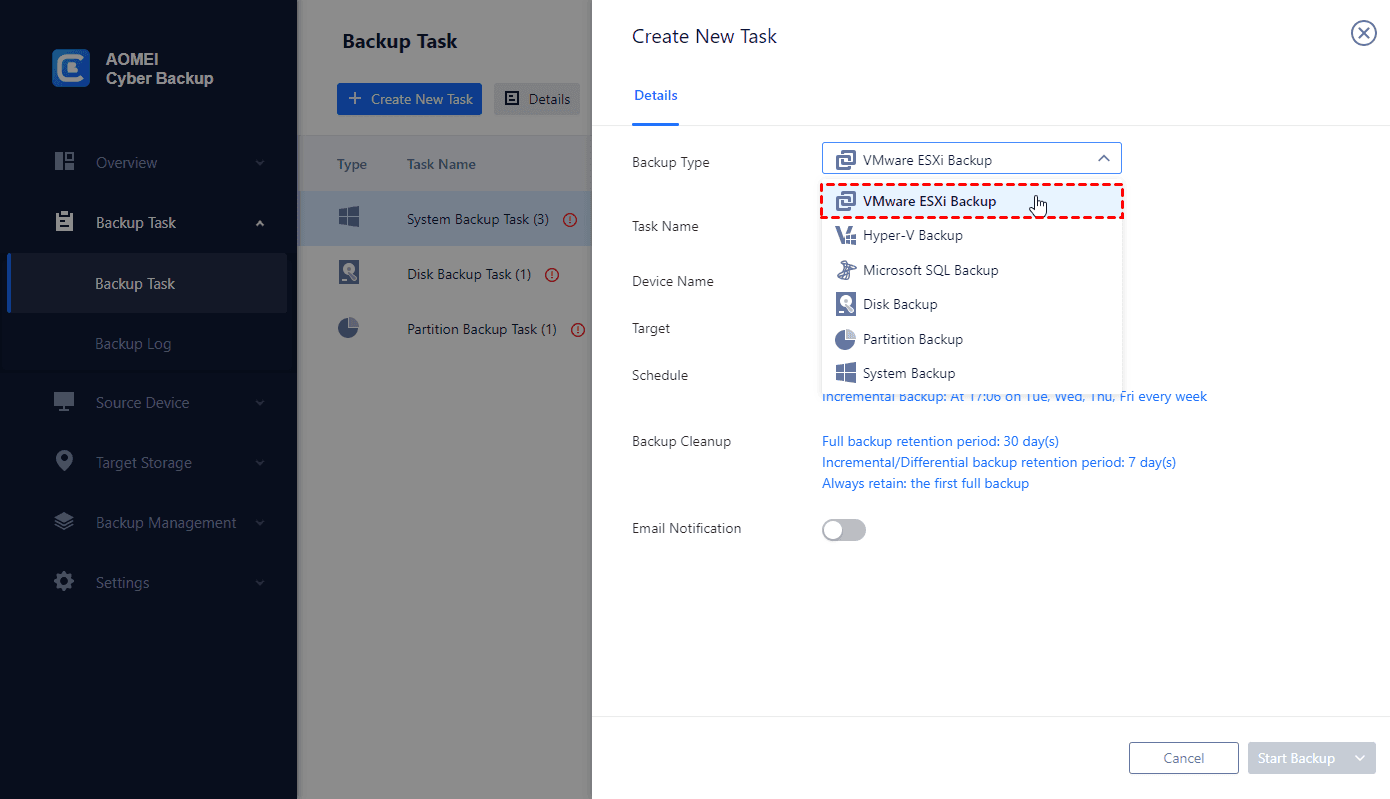
- Device: You can cover multiple VMs on the host within one backup task.
- Target: You can select to back up to a local path, or to a network path. Used paths will be saved in Favorite Storage for handy selection.
- Schedule: You can choose to perform full, differential or incremental backup, and automate execution daily, weekly or monthly according to the frequency you specified.

3. Run Backup: Click Start Backup and select Add the schedule and start backup now, or Add the schedule only.

Created backup tasks will be listed and monitored separately, for progress checking and schedule changing.
✎While the Free Edition covers most of VM backup needs, you can also upgrade to enjoy:
Batch VM Backup: batch backup large numbers of VMs managed by vCenter Server or on standalone ESXi hosts.
Backup cleanup: Configure a retention policy to auto delete old backup files and save storage space.
Restore to new location: Create a new VM in the same or another datastore/host directly from the backup, saves the trouble of re-configuring the new VM.

Two built-in features to backup VMware ESXi virtual machines
How can vSphere backup virtual machine if you only have a standalone ESXi host without vCenter Server? In this section, I will introduce 2 ways for vSphere backup VM using built-in features.
● Manually download VM files: VMware ESXi Web Client allows you to download all the VM files, including VMDK virtual disk file and VMX configuration file from datastore. When restoring, you can then upload these files and register a new VM, on original or another host.
● Export VM to OVF template: Open Virtualization Format (OVF) is a file format that supports exchange of virtual appliances across products and platforms. Since OVF files are compressed, you can achieve faster downloads.
✎Both of them are actually not conventional backup methods. For long-term data protection, it is still recommended to use VMware backup solution.
Way 1. Manually download virtual machine disk files
1. Access ESXi Web Client, commit all snapshots and power off the virtual machine you want to back up.
2. Turn to Storage page, click Datastore browser on toolbar.

3. Go to the folder of the virtual machine you want to back up, and then click Download on toolbar to download them separately to local.

4. Close Datastore browser window, and you can see the progress in Recent tasks.
Way 2. Export the virtual machine as OVF template
1. Access ESXi Web Client, commit all snapshots and power off the virtual machine you want to back up.
2. Turn to Virtual Machines page, right-click the virtual machine you want to back up and select Export. Click OK in the pop-up window.

3. Select Save File option twice to download the .ovf file and .vmdk file. Click OK to close the window. You can see the progress in Recent tasks.

When it’s done, you can click download button on toolbar to find where these files are stored.
Tip: You can also use VMware OVF Tool to export your VMware ESXi VMs. To save local storage and add an extra layer of data protection, it is also a good idea to backup VMware to an external hard drive or flash drive.
Note: VM snapshots cannot replace backups
VM snapshots can quickly roll back VM to the point in time when the snapshot was taken, which is also useful as a data protection measure before performing dangerous tests. However, VM snapshots cannot replace backups, and using only snapshots instead of backups can be very dangerous. Compare VM snapshot vs backup, there are 2 main differences:
- Snapshots are dependent on the parent disk. If the parent disk is deleted, the snapshot itself is not sufficient for VM restore. But backups are independent of the original VM, are not affected, and can be stored offsite.
- VM snapshots can affect VM performance. Incremental disk files can grow and take up a lot of space, keeping snapshots for long can affect VM performance. But VM backups can be stored safely for a long time without affecting VM performance.
Therefore, it is recommended that VM snapshots be used as a short-term, temporary rollback measure before unsafe operations, keeping only 2-3 snapshots in the chain for no more than 72 hours each. Virtual machine backups, on the other hand, can be used as long-term, stable virtual machine protection for disaster recovery.
How to back up VMware ESXi host configuration
When it comes to VMware ESXi VM backup, except for the VM itself, there is also another common user concern: Do you need to backup VMware ESXi host configuration? Actually, backing up VMware ESXi host configuration is not necessary. Redeploying a host is not difficult, and many system deployment tools available for businesses will make the process even faster and easier.
But if you still want to backup VMware host, you can refer to the following content, we will list 3 ways to perform this. If you need detailed steps and more information about it, please refer to this article: 3 Quick Ways for VMware ESXi Backup Host Configuration.
Method 1. Backup ESXi hosts with ESXi Command Line
ESXi command line is the direct way to create backup for host. You don't need to install an additional program to use it.
Step 1. Connect your ESXi host to SSH (Secure Shell)
Step 2. Run this command to check and sync configuration with the persistent storage:
vim-cmd hostsvc/firmware/sync_config
Step 3. Backup your ESXi host configuration by running the following command:
vim-cmd hostsvc/firmware/backup_config
Then you will get a link to download the files saving the configuration, like the screenshot below.

Step 4. Open a web browser and copy the link to it. Replace the "*" with your ESXi host IP/FQDN. And hit the Enter. Then the backup files will be downloaded to your download path of the web browser.
Method 2. Backup ESXi hosts using vSphere CLI
vSphere CLI, or vSphere Command-Line Interface is another tool can help you backup ESXi configuration. Noticing that vSphere CLI is not available since vSphere 7.0, please make sure your virtual infrastructure supports it.
Step 1. Download and install vSphere CLI.
Step 2. Run the backup command below:
vicfg-cfgbackup --server=ESXi_host_IP_address --username=root -s output_file_name
Wait for a whole, your configuration files will be saved to where you run the vicfg-cfgbackup script.
Method 3. Backup ESXi hosts using vSphere PowerCLI
Step 1. Download and install vSphere PowerCLI.
Step 2. Execute the command to backup host configuration:
Get-VMHostFirmware -VMHost ESXi_host_IP_address -BackupConfiguration -DestinationPath output_directory
Replace the "ESXi_host_IP_address" and "output_directory" with your actual IP address and output backup directory.
Then the backup files will be saved to the output directory you set.
Summary
Regular ESXi backups can effectively protect your data from loss. In this article, I briefly introduced 2 ways to back up VMware ESXi VM using built-in features.
However, they can only be performed manually and can only backup one VM at a time. If you want an auto VMware ESXi backup software, AOMEI Cyber Backup can protect your ESXi data continuously in vSphere environment.