6 Easy Fixes to “The Disk Is Write Protected” in Windows 11
You are in the right place if you receive “The disk is write protected” in Windows 11 while attempting to make changes on a USB drive, SD card, or external disk. Here are 6 effective methods.
By Ivy / Updated on April 3, 2024
Windows Says the Disk Is Write Protected
“Windows 11 trying to format a flash drive, but it says “The disk is write protected”. Is there any way to remove write protection on USB drive? I don’t want to lose any data on it. Any suggestions will be appreciated.”

When your flash drive becomes write-protected, you can no longer add new data to it, modify or delete any data already on it, or format it. You will then receive this write-protected error when attempting to do so. The error message may vary depending on your operations:
- If you format a write-protected disk, you will get “The disk is write protected.”.
- If you make changes to files in it or add new data, you will get “The disk is write protected. Remove the write-protection or use another disk.”
- If you try to overwrite a write-protected file, you will get “The file is set to read-only. Try again with a different file name.”
Also, you may receive these error messages on an external hard drive, SD card, etc. Worry not, this article will tell you how to remove write protected from disk in Windows 11 and make it reusable.
What Are the Causes for a Write Protected Disk
You must be curious about the reason why your disk (e.g. external disk, flash drive, SD card, etc.) becomes write-protected. It may provide you with some clues to solve the problem. We have collected the following possible reasons for you.
- The physical write protection switch is activated.
- The disk space is full.
- The disk is infected by viruses or malware.
- The administrator set a security setting to prevent you from writing.
- The drive is corrupted.
- You try to copy and replace a file set as read-only status.
Fix “The Disk Is Write Protected” in Windows 11
After knowing the possible reasons, you may have clues to solve this write-protected error. If you don’t have any idea, it does not matter. This article will introduce you to several methods and how to fix it step by step.
- If your files are write-protected, simply go to its Properties window, select General, and uncheck the Read-only attributes.
- If your disk is write-protected, the easiest method is to check the physical switch. You can also try the other 5 methods.
Way 1: Check the Physical Switch
If your disk is a USB drive, SD card, or Pen Drive, you may need to check the write protection switch (also called a lock switch) and be sure it is set to write, not read-only. If it’s in read-only mode, toggle it to the unlock position. You can then try to access your disk and make changes to the data on it.
Way 2: Clear Read-Only Disk Attributes
If you still receive “The disk is write protected” error, you can try DiskPart to remove write protected USB in Windows 11. Here’s how it works!
Step 1. Connect USB drive to Windows 11 and be sure it’s recognized. Press Win + X and select Run, then type diskpart in the box and click OK.
Step 2. In the Command Prompt window, type the following commands and press Enter after each line.
- list disk
- select disk X: (X: is the drive letter of write-protected USB)
- attributes disk clear readonly
Way 3: Modify the Registry
If you use a work, school, or public computer, it is possible that the administrator set a security setting to prevent you from writing. You can choose to modify the registry key. But this method may result in data loss if there are any mistakes. Please backup the Windows registry before making any changes.
Step 1. Connect the write-protected USB drive to Windows 11. Press Win + R to open the Run window, type regedit and click OK.
Step 2. Navigate to the following path. Then, right-click the WriteProtect key and set its value to 0. Finally, click OK.
HKEY_LOCAL_MACHINE\SYSTEM\Current Control Set\Control\Storage Device Polices
Note: If there is no WriteProtect key in Register, you need to create a new one. Right-click the blank space, select DWORD (32-bit) Value and name it as WriteProtect.
Way 4: Disable Disk Quota Settings
If your disk is full or you exceed the disk quota limit, you are not able to write data on the disk unless it’s deactivated. Follow the steps below.
Step 1. Right-click the write-protected USB and select Properties.
Step 2. In the Properties window, select Quota and Show Quota Settings.
Step 3. Uncheck Enable quota management and click Apply > OK to deactivate this setting.
Way 5: Disable Bitlocker Encryption
If you enable Bitlocker encryption on USB drive, external disk, or SD card, Microsoft will not allows you to write data or copy files to your devices. You can choose to disable Bitlocker encryption and check if you still receive “The disk is write protected.” error message.
Step 1. Go to Control Panel and select BitLocker Drive Encryption.
Step 2. Go to Removable data drives - Bitlocker To Go, select the write-protected USB drive and click Turn off BitLocker.
Step 3. You will receive a confirmation message. Click Turn off Bitlocker again. Now you just have to wait for the decryption to complete.
Way 6: Scan and Remove Viruses
If the above methods are not working, this write-protected error may be caused by viruses. You need to scan this disk with Windows Defender and remove viruses to regain the write permission of it.
Step 1. Go to Settings > Windows Security and select Virus & threat protection.
Step 2. Select Scan options under Current threats.
Step 3. Select Custom scan and click Scan now.
Step 4. Go to This PC and select the write-protected USB drive.
Step 5. Click Select Folder to start the scanning process and remove the found viruses.
Recover Data and Format Write Protected Disk
If you cannot fix “The disk is write protected” in Windows 11 with all of the methods above, it’s probably because the disk is not write protected but corrupted. In this case, you can try to format this USB drive. But the formatting process will delete all the data on it. To avoid data loss, you’d better recover data from this disk first.
Part 1: Recover Data from Corrupted Disk
MyRecover is one of the best Windows data recovery software. With it, you can easily recover data from corrupted disk, with a high success rate and fast speed, and deal with comprehensive data loss scenarios such as virus attack, malware infection, format, system crash, etc.
- Support two advanced scanning methods - Quick Scan and Deep Scan. It helps to find all the data stored on the corrupted disk.
- Recover Word documents, Excel files, PPT, pictures, videos, compressed files, etc and more than 200+ file types.
- Keep the recovered files with the original file name, format, quality, and path.
- Filter specific files and recover them immediately during the scanning process.
- Support Windows 7, 8, 10, 11, etc, and Windows Server.
To get started, download Windows data recovery software- MyRecover and install it on your Windows PC. Meanwhile, connect your corrupted USB drive as well. You can also use it to recover data from corrupted SD card, external disk, etc.
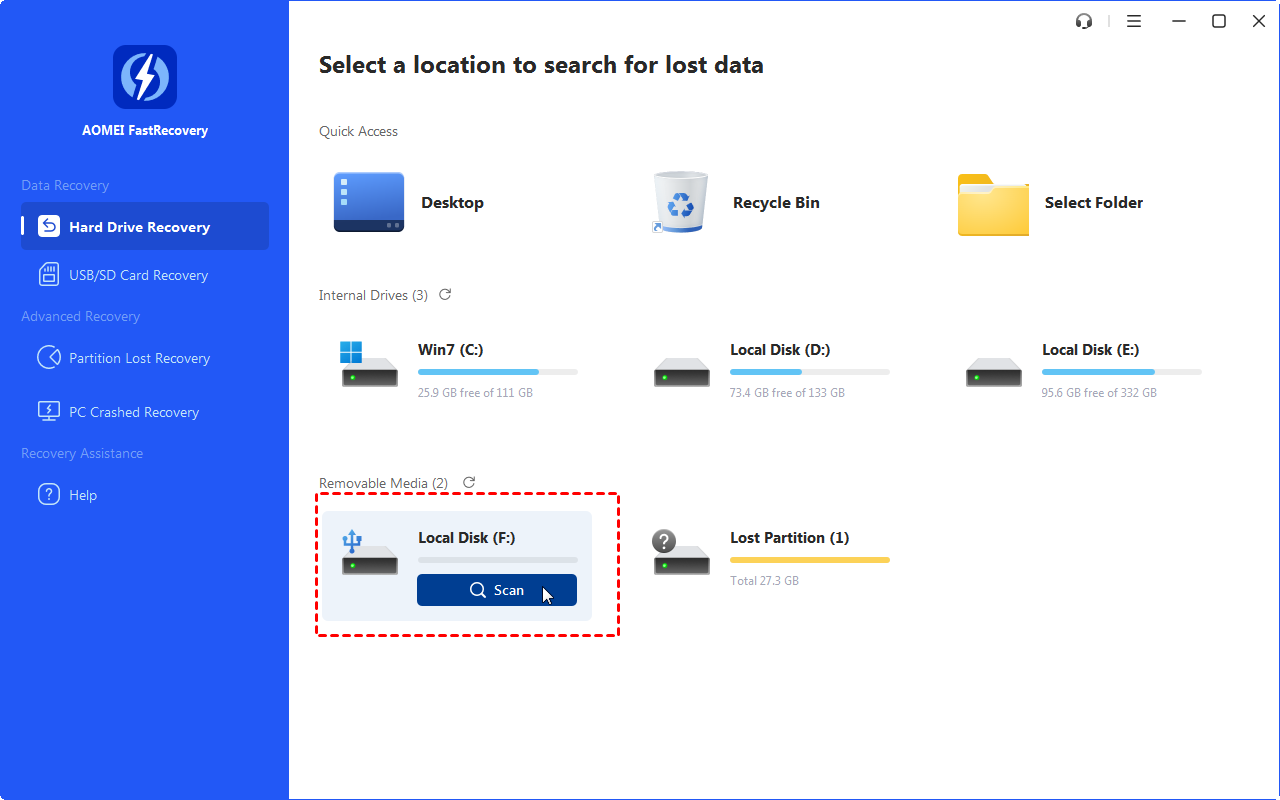
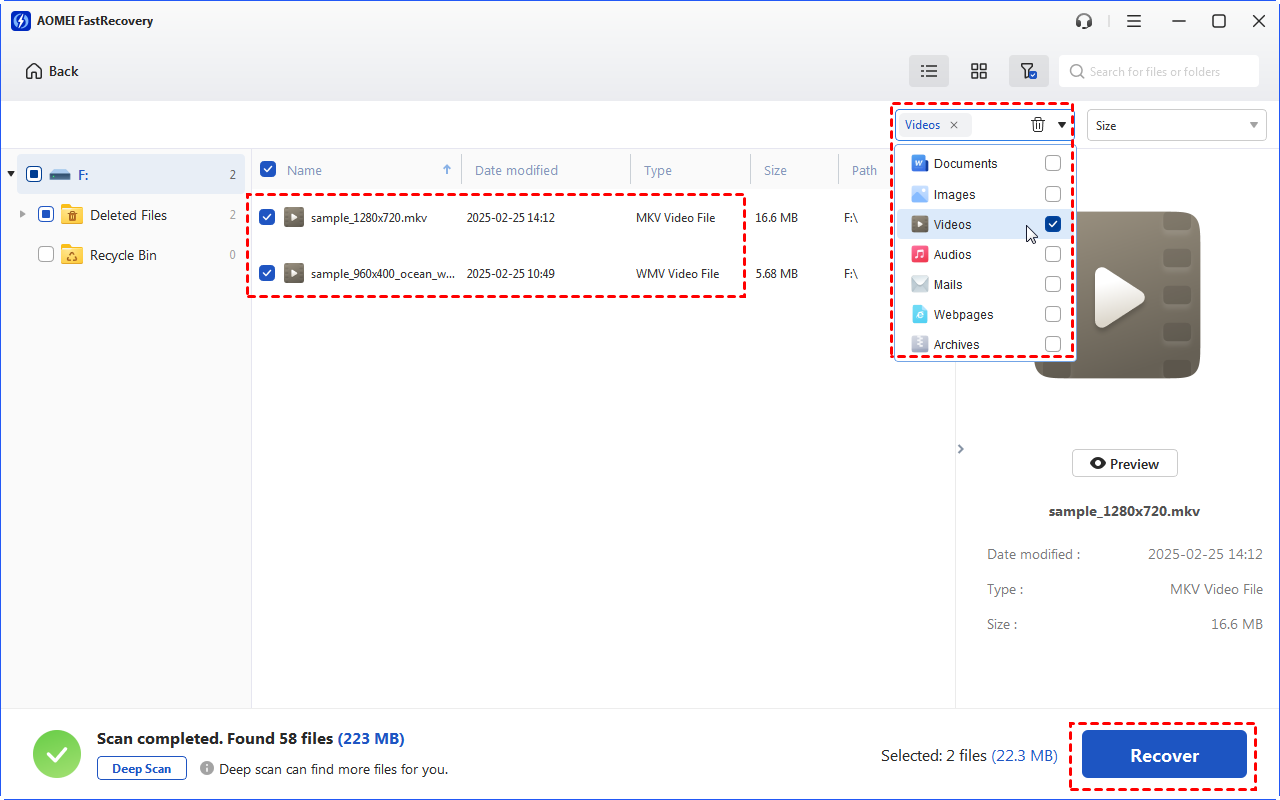
Step 1. Launch Windows data recovery software- MyRecover. Hover the mouse over the USB drive saved deleted files before, and click Scan.
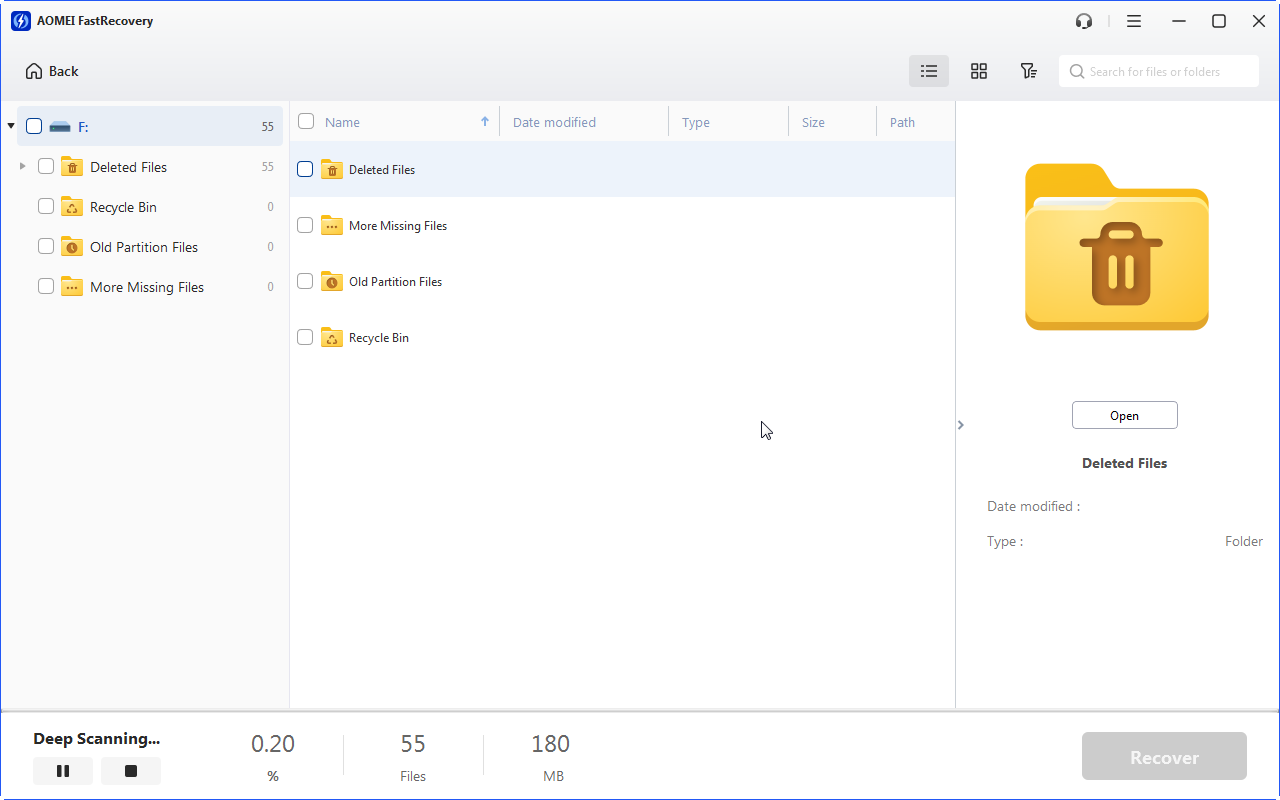
Step 2. The software will run Quick Scan & Deep Scan automatically and find all the data on the selected drive. Once any of the files are found, it will display in the following window.
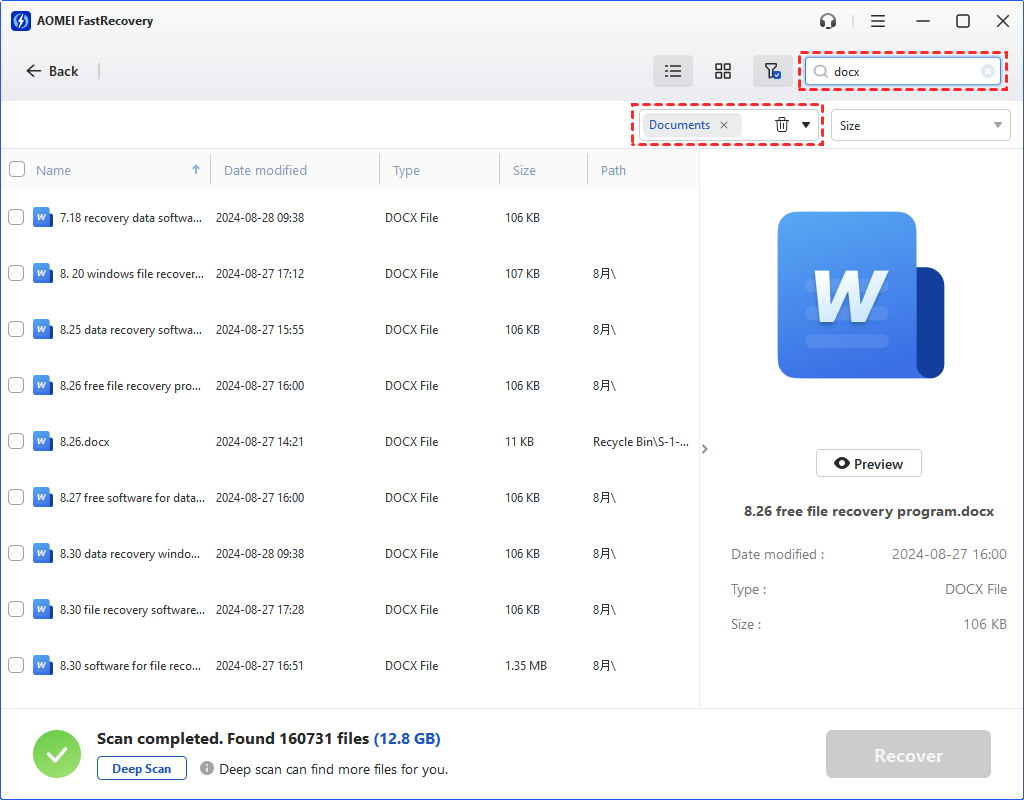
You can also locate specific files if you don’t want to recover all of the files on this USB drive. Here are two available ways in the following:
- Directly type its file name in the Search for files or folders box.
- Use the Filter feature. You need to select file type (eg: Word documents), date modified or size.
Step 3. Select the files you want to recover and click Recover XX files. You can also wait for the final scanning result.
Notes:
- MyRecover will display the number of files to be recovered and their entire size. You can recover files freely up to 500MB in total. To recover unlimited files, please upgrade MyRecover.
- Select a new location to store files on the corrupted drive. Retrieving files to original location may overwrite the space of deleted data, resulting in data recovery failure.
- You still can use it to recover deleted files from Windows Server 2016, 2019, 2022, etc.
Part 2: Format Disk to Make It Reusable
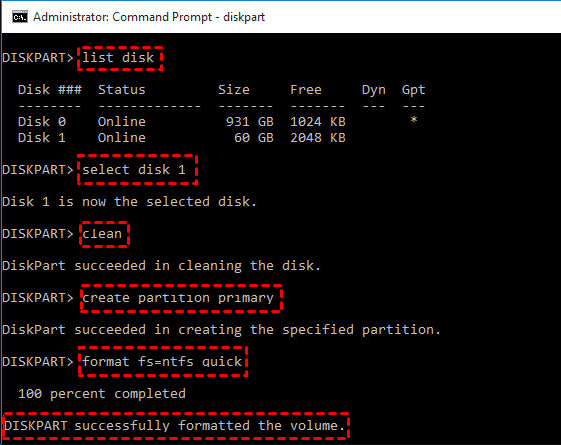
Step 1. Press Win + R and type diskpart in the Run window. Then, click OK to open it.
Step 2. Enter the following commands and press Enter after each line.
- list disk
- select select M
- clean
- create partition primary
- format fs=ntfs quick (or format fs=fat32 quick)
- exit
Notes:
- M is the disk number of the RAW drive.
- The clean command will delete all the data on the drive.
Concluding Words
You can easily fix “The disk is write protected.” in Windows 11 whether it’s a file or an entire disk. By comparison, remove write protected for a single file or folder is easier, you just need to uncheck the Read-only attributes in the Properties window.
For disk-write protection, it’s much more complicated. Please learn the possible reasons first and then try the 6 available methods above. Also, it’s possible the disk is corrupted. If so, the only way is to format the disk. To avoid data loss, please recover files from the USB drive first.