Fixed: The Device Is Not Ready in Windows 10 or 11| 8 Ways
While trying to access data from a device, but receive the “The device is not ready” error? Get the possible reasons and 8 effective methods to fix it easily and quickly.
By Ivy / Updated on April 2, 2024
You may use external hard drives, USB drives, SD cards, and other storage devices to store your data and take it anywhere. Thus, you can access your data at any time. However, they are not without flaws. If your device is not ready for use, it will prompt you with one of the following error messages .
- Virtual Disk Manager the device is not ready.
- G: \ is not accessible. The device is not ready.
- Diskpart has encountered an error. The device is not ready.
- ...
However, there is no need to panic. Because there can be several reasons behind it. And this article will provide you with 8 effective solutions to fix "the device is not ready" in Windows 7, 8, 10, 11, etc. Let's dive right in!
Why Do You Receive "The Device Is Not Ready" Error?
“The device is not ready” is a common disk errors in disk management or diskpart. But it’s still worth knowing the possible reasons. Because it may give you some clues to fix this error.
- faulty connections
- compatibility issues
- corrupt drive
- hardware failure
- file system corruption
- bad sectors
- corrupted controller drivers
- virus infection or malware
- physical damage
How to Recover Data from The Device Is Not Ready
If you are experiencing “the device is not ready” external hard drives, USB drives, SD cards, etc in Windows 7, 8, 10, 11, etc, then the device is not accessible, along with its data. To avoid data loss in the repair process, it’s suggested to recover data from inaccessible drive first.
You need the help of a professional data recovery software like MyRecover. It has a high success rate and fast recovery speed. And it is able to handle all-inclusive data loss scenarios, such as accidental deletion, virus infected, corrupted drive, and more. Below are key features of this software:
- 200+ file types: It is able to recover Word documents, Excel files, PowerPoint, photos, audios, videos, emails, webpages, compressed files, etc without reducing the quality.
- Multi-devices compatible: It allows you to recover files from inaccessible drive like internal or external disk, flash drive, SD card, etc.
- Multiple systems compatible: It supports Windows 7, 8, 10, 11, etc and Windows Server.
Besides, this software has a user-friendly interface, which makes the data recovery process smooth. You don't need any technical knowledge to use it effortlessly.
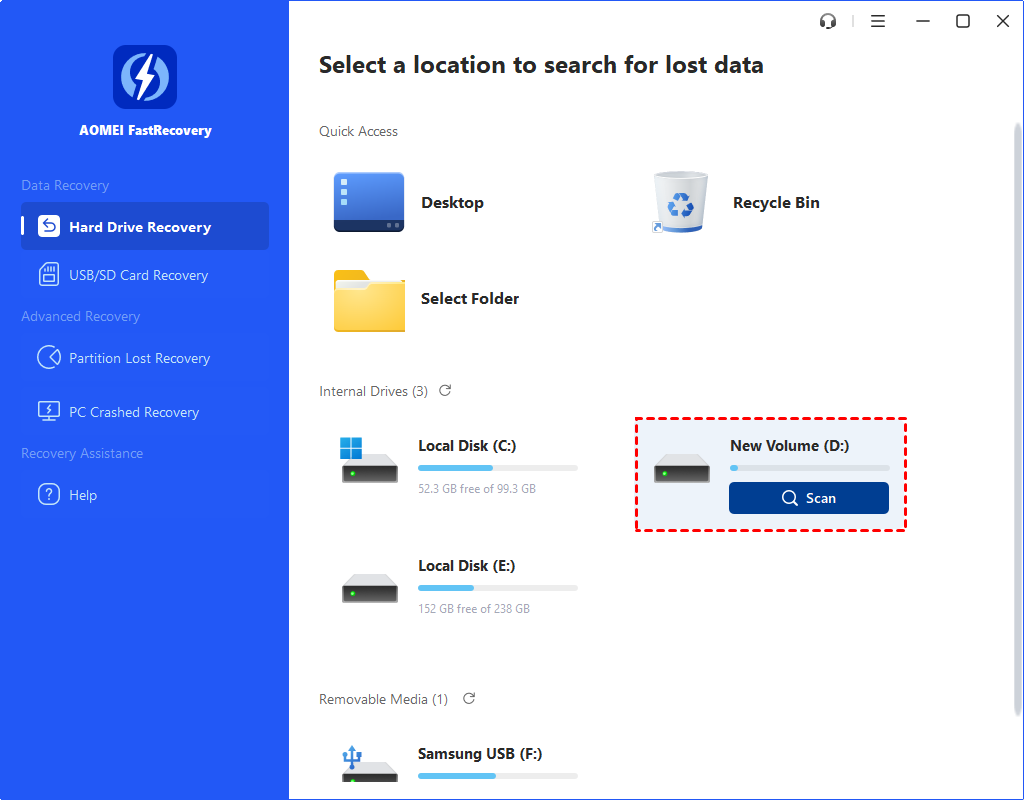
Step 1. Install and launch professional Windows data recovery software - MyRecover. Hover the mouse over the inaccessible drive, and click Scan.
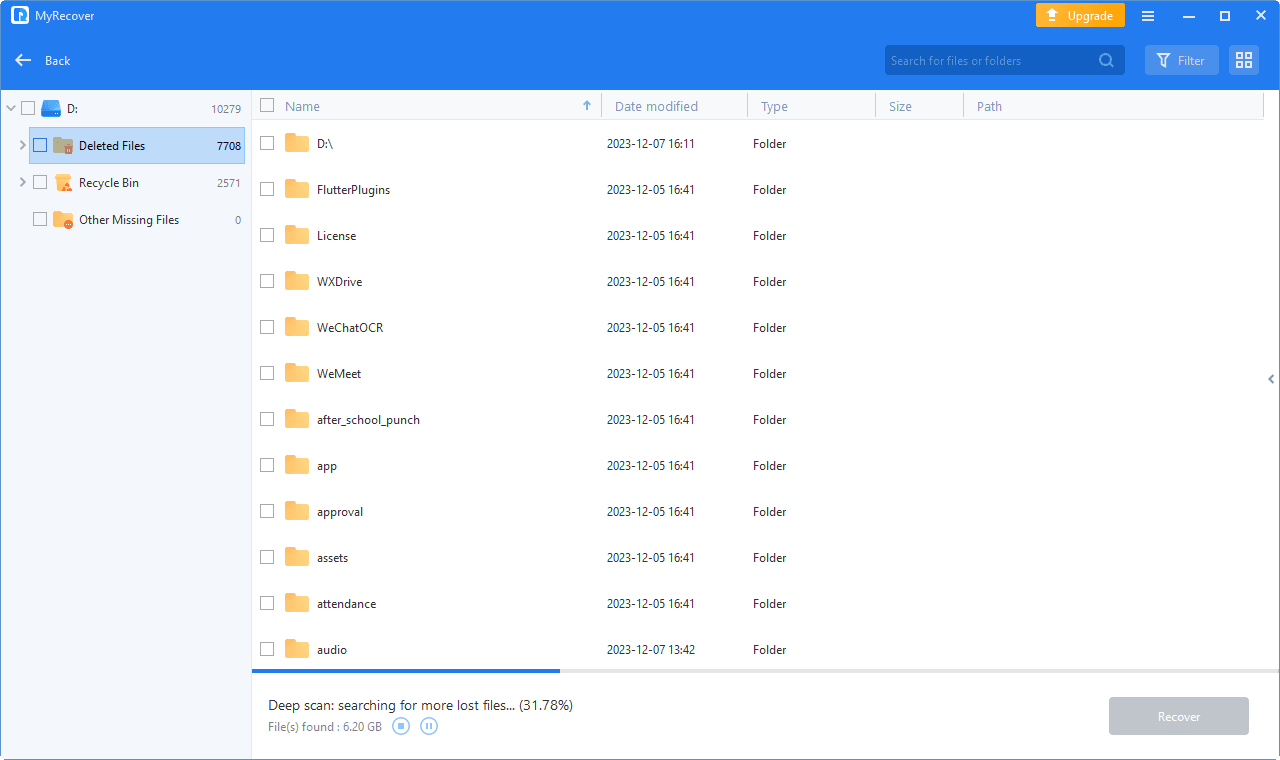
Step 2. It will run two advanced scanning methods - Quick Scan & Deep Scan automatically and display all the found files or folders on the selected device. You can filter and preview files on the disk. Here are two methods:
- Click Filter and select a file type, such as Documents. Then, type file name or file extension in the Search for files or folders box.
- Expand the Deleted Files, Recycle Bin, or Other Missing Files tab to preview files in the accessible drive.
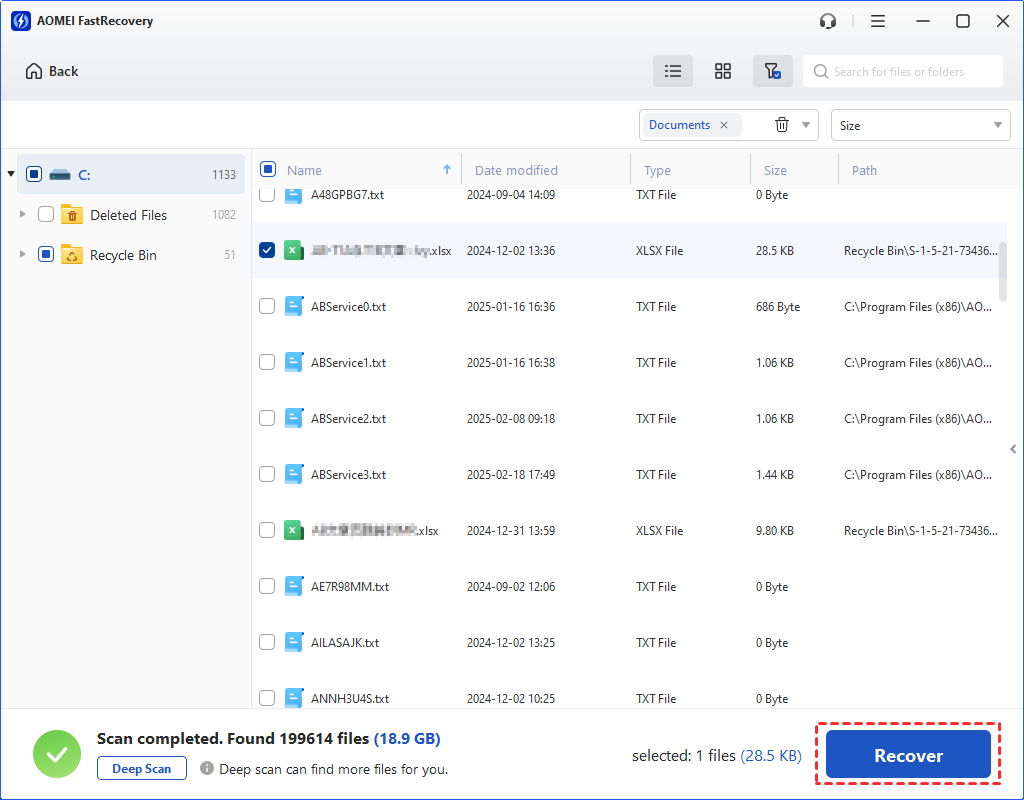
Step 3. Select all the files on the accessible disk and click the Recover x files button. You will then be asked to select a location. Please select a new location instead of original location.
Notes:
- The restore button will display the number of selected files and their full size. You can use it to determine the integrity of the recovered files.
- Saving the recovered files to original location may cause data corruption or further data loss.
- You can recover files in the accessible drive for free, up to 500MB in total. Try advanced editions if you want to recover all files.
- Except for recovering data from the device is not ready, you can also use it to recover files from a formatted disk, fix RAW drive without losing data, etc.
How to Fix "The Device Is Not Ready" Error in Windows
Now that you have a better understanding of the potential causes behind "the device is not ready" error message. The reasons for different storage devices like external hard drives, flash drives, etc are similar. So, regardless of your device type, you can try the following 8 methods.
1. Verify the External Device Connection
Starting by checking the disk connection is a good start. If your USB port is loose or damaged, you may receive this error. The same goes for problems with USB cables or this PC.
Step 1: Unplug the device and reconnect it to your PC using the same USB port. If this error is not existing, your USB port is probably loose.
Step 2: If it still exists, the problem may be a corrupted USB port. Disconnect the device again and wait for about 2 minutes. Then, plug the device into another USB port.
Step 3: Afterwards, consider using a different USB cable.
Step 4: Finally, connect your device to another machine and check if it is ready for use.
2. Reinstall the USB Driver
Unstable or corrupted USB drivers can often cause “initialize disk the device not ready" error. You can choose to reinstall or update disk driver in the Device Manager.
Step 1: Right-click the Start menu and select Device Manager.
Step 2: Expand Universal Serial Bus Controllers, right-click the corrupted device and select Uninstall.

Step 3: Wait until the process is complete and reboot your system. Try to access your device and see if this error still exists.
Alternatively, if your device is an external hard drive, try to reinstall disk driver. The steps are similar, just expand Disk Drivers, right-click your drive, and select Uninstall Device in Step 2.
3. Run Disk Check Utility
Sometimes, file system errors can cause the "virtual disk manager the device is not ready" error.
You can check disk errors or bad sectors on the device using the CHKDSK command.
Step 1: Right-click on the problematic device and select Properties.
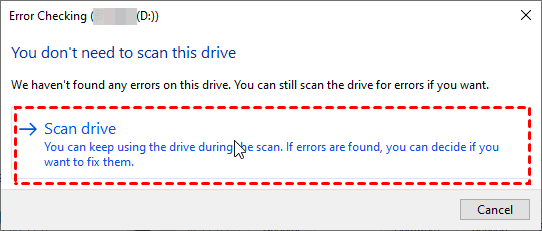
Step 2: In the "Tools" tab, go to the Error checking section and click Check.
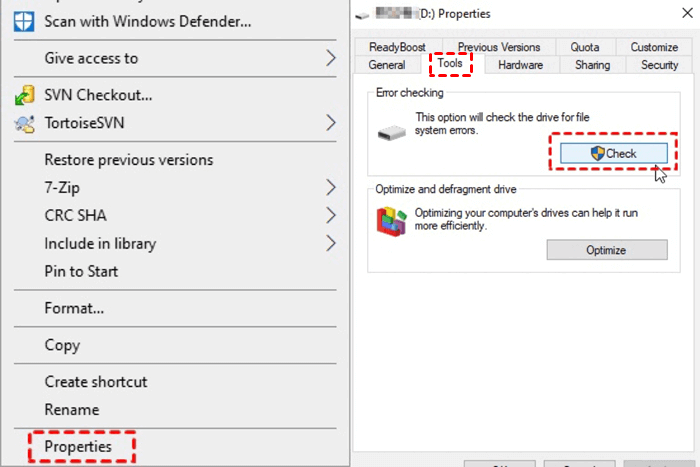
Step 3: Click Scan drive. It will start to scan and repair any found disk error automatically.
Alternatively, you can use the CHKDSK command. Here's how:
Step 1: Open the search box, type cmd and click Run as administrator.
Step 2: Type chkdsk *: /f and press Enter in the Command Prompt window. Replace "*" with the correct drive letter.
You may receive the “CHKDSK is not available for RAW drives” error if this device becomes RAW. If you are experiencing this error, please format this drive directly.
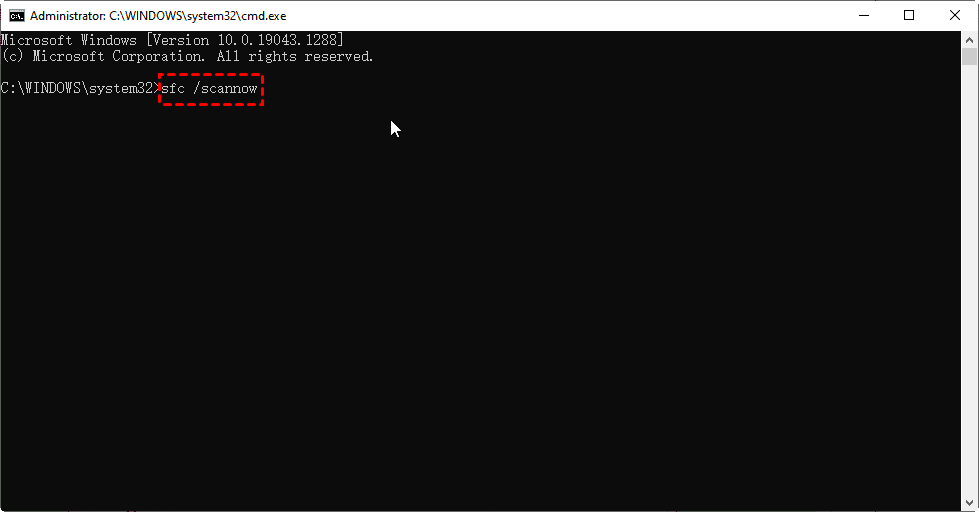
4. Run SFC command
To establish a connection between a drive and your system, certain files are required. If these files become corrupted, the process may fail, throwing the device is not ready error. The System File Checker (SFC) helps to check for file corruptions.
Step 1: Search for the command prompt and select Run as administrator.
Step 2: Type sfc /scannow and press Enter in the Command Prompt window.
5. Troubleshoot the Device Automatically
If the disk failed or the storage controller is corrupted, you may encounter the "diskpart has encountered an error the device is not ready" message. However, you can repair this device automatically.
Step 1: Type Troubleshooting in the search box and open it.
Step 2: In the Hardware and Sound section, click Configure a device.
Step 3: Tap on Advanced. Then, select Apply repair automatically and click Next in the new window.
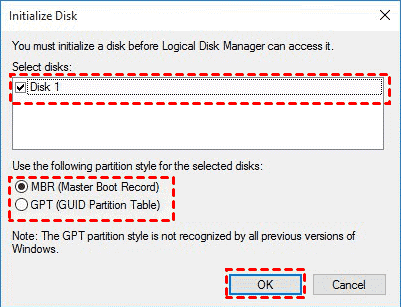
6. Initialize the Device
If the driver fails to initialize, you may encounter the "Virtual Disk Manager the device is not ready" error. However, you can fix it by following these steps:
Step 1: Press the Win + R keys, type diskmgmt.msc and click OK. It will open the Disk Management automatically.
Step 2: Right-click on the disk with the “the device is not ready” error and choose Initialize Disk.
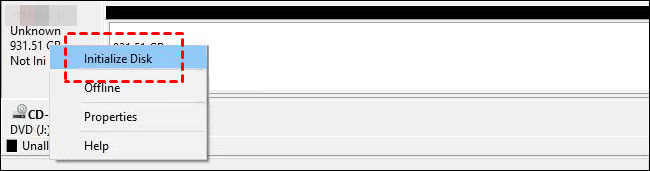
Step 3: In the dialog box, select the unknown not initialized disk and choose either MBR or GPT partition style. Click OK to start the initialization process.
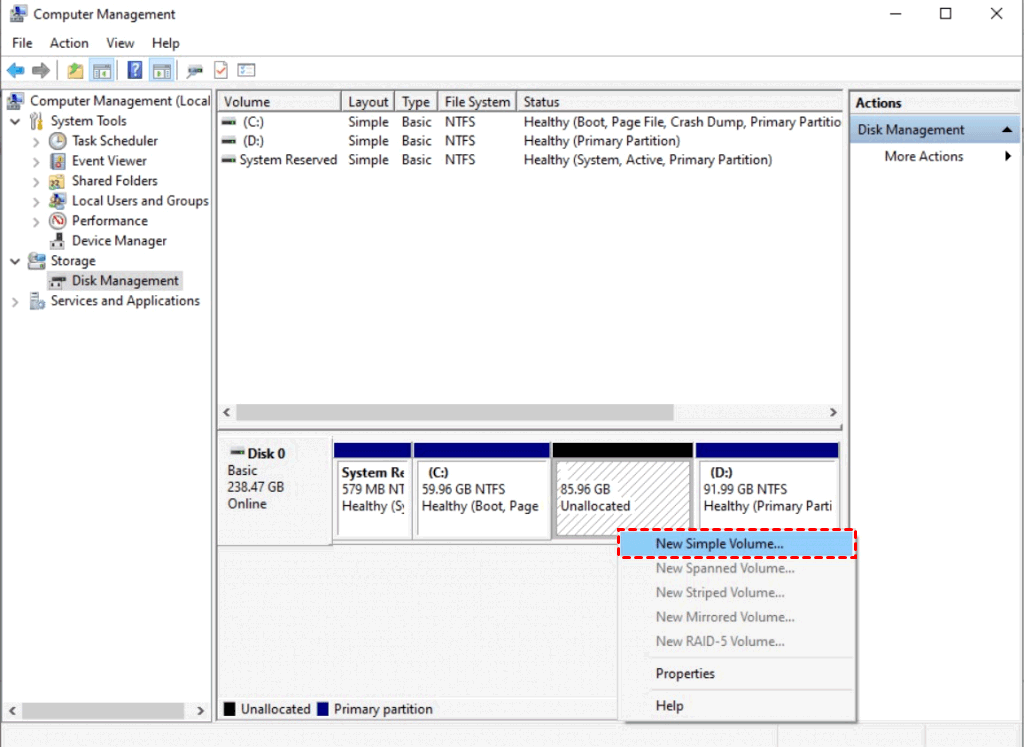
7. Create a New Partition
If your disk shows as unallocated space and receive “the device is not ready” in Disk Management, you can choose to create new partition with this space.
Step 1: Right-click the Start menu and select Disk Management.
Step 2: Locate the unallocated space, right-click it and select New Simple Volume.
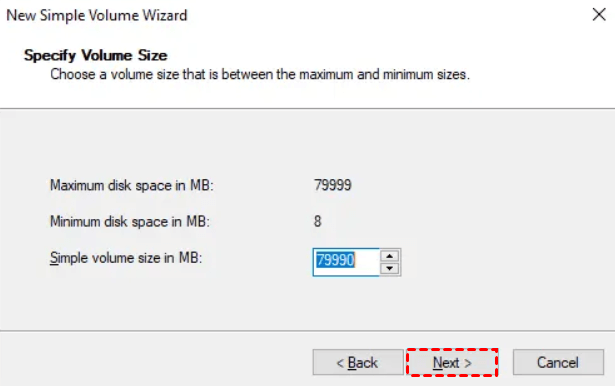
Step 3: In the New Simple Wizard, click Next.
Step 4: You will be asked to specify a capacity, drive letter, and file system. Just do as suggested and click Next finally.
8. Format RAW Disk
If your disk becomes RAW and receives “the device is not ready” in Disk Management, the easiest way is to format disk with a compatible file system, such as NTFS, FAT32, FAT16, exFAT, etc. However, this process will cause data loss. To prevent this, please recover data from RAW drive first.
Step 1: Press Win + X and select Disk Management. Then, find the external hard drive labeled with RAW.
Step 2: Right-click the RAW external drive and select Format.
Step 3: In the Format window, select NTFS file system and click OK.
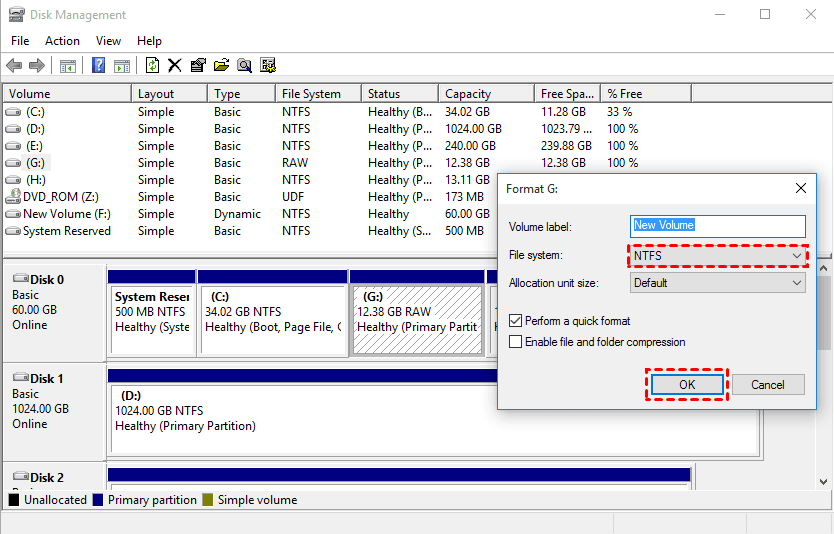
Step 4: Then, you will see a warning message, saying the formatting process will erase all data on it. Click OK again.
The Bottom Line
Encountering the "virtual disk manager the device is not ready" error can be frustrating, but there's no need to panic. By following the solutions mentioned above, you can resolve the issue and regain access to your storage devices. Additionally, using reliable data recovery software like MyRecover can help you retrieve valuable data from inaccessible drives.
Remember to always prioritize data recovery and protection by choosing trustworthy software. With the right tools and methods, you can overcome the "device is not ready" error and ensure the safety of your files.